The Battle of Goose Green stands as one of the most dramatic and significant engagements of the 1982 Falklands War between Great Britain and Argentina. This confrontation saw the British Parachute Regiment overcoming a numerically superior Argentine force to capture a strategically vital airfield.

Terry Bailey explains.

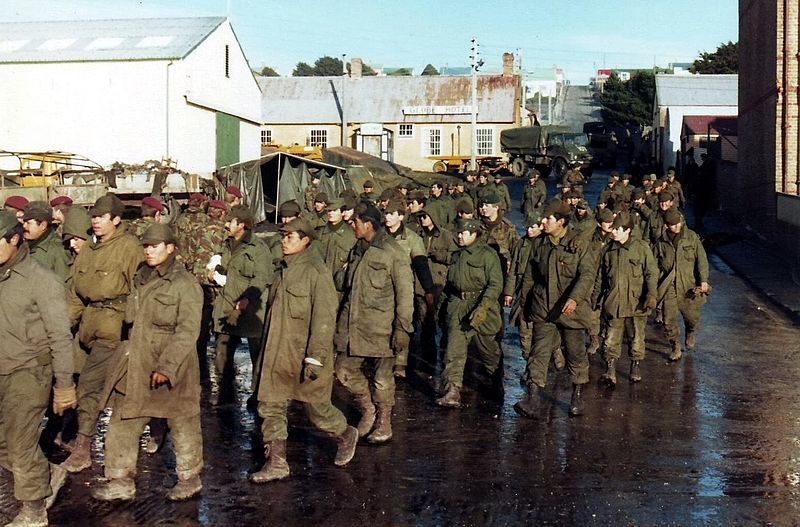
What is left of the 1982 Argentinian defensive positions on Darwin Ridge, Darwin, Falkland Islands. Source: Farawayman, available here.

Introduction

In April 1982, Argentina invaded the Falkland Islands, a British overseas territory, triggering a military response from Great Britain. The British government, led by Prime Minister Margaret Thatcher, was under immense political pressure to reclaim the islands swiftly. The international community, particularly the United States, closely watched Britain's military response. These international overseers added to the urgency of a decisive victory, simply because the international community were pressing for a negotiated settlement. A British task force was en route within 3 days of the Argentine invasion.

It is worth noting that Argentina and Great Britain had spent numerous years talking about the Falkland Islands' future long before the Argentine invasion, including a potential dual sovereignty proposal.

However, now that Argentina had invaded and a British task force had set sail, it looked like war was inevitable. The British forces landed on the Falklands and began their advance. Goose Green, a settlement on East Falkland, became a focal point. The Argentine forces had fortified the area in depth, including the nearby airfield, which was crucial for controlling air operations in the region. Military and political leaders in London and the field recognized that capturing Goose Green would deliver a significant blow to Argentine morale and strengthen the British position.

Brigadier Julian Thompson, the immediate commander of the British land forces, faced considerable pressure from the British government to produce quick results. Although some military advisors suggested bypassing Goose Green to avoid heavy casualties, the political imperative for a visible and symbolic victory prevailed. Consequently, the 2nd Battalion, Parachute Regiment (2 PARA), under the leadership of Lieutenant Colonel Herbert "H" Jones, was tasked with the audacious assault.


Strategic Overview

The overall strategy for the British forces involved a multi-pronged advance to recapture key positions on the Falklands. Goose Green, located on a narrow isthmus on East Falkland, was defended by a strong Argentine force commanded by Lieutenant Colonel Ítalo Piaggi, numbering over 1,200 men and were well-entrenched with machine guns, mortars, and artillery support.

In contrast, 2 PARA comprised approximately 600 soldiers, half the strength of the Argentine defenders. Despite this disparity, the British strategy hinged on surprise, speed, and superior training, in addition to the skill of their troops. The plan involved a night march of approximately 21 kilometers to position the battalion for a dawn assault, to use the element of surprise to disorient the defenders and secure key objectives swiftly. However, the media had managed to transmit the story before the assault occurred, thereby, the element of surprise was lost and Argentine forces were substantially reinforced and ready for the assault.

Under cover of darkness on the 27th of May, 2 PARA advanced towards the settlement, navigating difficult terrain and maintaining strict noise discipline aimed at avoiding detection. The plan was to launch a coordinated attack at first light, striking the surrounding Argentine positions with overwhelming force.

The battalion's companies were each assigned specific objectives. 2 Para were unaware that the Argentine forces were expecting an assault and had reinforced the whole Goose Green area.

A Company, under the command of Major Dair Farrar-Hockley, were to take Burntside House as their first objective, B Company, under the command of Major John Crossland, followed in the next phase of the attack and was to secure Burntside Hill and then continue to Boca Hill.

Where A Company had advanced down the left side of the isthmus, B Company were to follow the coast on the right side of the attack. After a significant delay, the advanced initially encountered very little resistance in the forward trenches. Approaching Burntside Hill, they exchanged fire with the Argentine defenders, however, on reaching the top of the hill, they found the first positions empty.

The Coronation Ridge position temporarily halted Major Neame's D Company as they advanced between A and B companies. However, D Company soon encountered heavy fire from an Argentine machine gun which was silenced by two paratroopers, allowing D Company to continue and clear the Argentine position on Coronation Ridge. These early encounters held up the advance for approximately 3 hours.

Then A Company, 2 Paras moved into the gorse line at the bottom of Darwin Hill facing the entrenched Argentines, who looked down on the British and thus were able to pin down the British with heavy machine gun and automatic rifle fire, in addition to, sniper fire, thus holding up the advance for a further hour.

At this point B Company broke off their attack and began to withdraw to the reverse side of Middle Hill and the base of Coronation Point due to being completely exposed to enemy fire, as the whole area was wide open and had no real cover available for the British.

A and B companies utilized this time to prepare temporary defensive positions while a re-organization of the attack was conducted by 2 Para's second-in-command. The British A and B Companies currently were unable to cross the open ground due to Argentine machine guns and sniper fire.

With both A and B Companies' advance halted and the entire attack in jeopardy, the 2 Para Commander, Lieutenant Colonel Jones led an unsuccessful charge up a small gully to try to regain the initiative. 3 of his men, his adjutant Captain Wood, A Company's second-in-command Captain Dent, and Corporal Hardman were killed when they followed his charge.

Shortly after that, Jones was seen to run west along the base of Darwin Ridge to a small re-entrant, checking his Sterling submachine gun, then running up the hill towards an Argentine trench. He was seen to be hit once, then fell, got up, and was hit again from the side. He fell meters short of the trench, H Jones was shot in the back and the groin, and died within minutes. Jones was posthumously awarded the Victoria Cross.

After a further 5 hours of fighting and ammunition supplies becoming critical, A Company eventually overcame the Argentine defenders on Darwin Hill, finally reporting it secure at 13:13 hrs local time, and advanced to take Boca Hill. Waving a white T-shirt from a rifle all resistance on the part of the Argentines holding Darwin Ridge ended, securing the outlying areas of Goose Green.

After securing Boca Hill and the battle for Darwin Ridge was over, the interim objectives had taken six hours of fighting, with heavy losses, the commanding officer, the adjutant, A Company's Second-in-Command, and nine non-commissioned officers and soldiers were killed with a further 30 wounded.

C and D Companies began to make their way to the airfield, as well as to Darwin School (to the east of the airfield), while B Company made their way south of Goose Green Settlement.

A Company remained on Darwin Hill. C Company originally held in reserve now advanced to contact and came under effective enemy fire sustaining heavy casualties.

The order to fix bayonets was given and C company continued their advance clearing the enemy positions as they traversed the boggy uneven terrain. The outer defenders fell back into the Darwin-Goose Green track and were able to escape. Sergeant Sergio Ismael Garcia of 25IR single-handedly covered the Argentine withdrawal during the British counterattack. For this, he was posthumously awarded the Argentine Nation to the Valor in Combat Medal.

By last light, A Company was still on Darwin Hill, north of the gorse hedge; B Company had penetrated much further south and had swung in a wide arc from the western shore of the isthmus eastwards towards Goose Green, but were isolated and under fire from Argentine positions and unable to receive mutual support from the other companies.

At this point further Argentine reinforcements were arriving; however, B Company 2 Para managed to bring down artillery fire on these new Argentine reinforcements, forcing them to disperse towards the Goose Green settlement, although some did re-embark and left with the departing helicopters that had deployed them.

At this point, C Company's attack had also stalled, after their battle at the Darwin Schoolhouse, now advancing towards Goose Green airfield they came under intense direct fire from 35 mm anti-aircraft guns from Goose Green.

Whereas, D Company had regrouped just before the last light, and they were deployed to the west of the dairy—exhausted, hungry, low on ammunition, and without water.

Food was redistributed, for A and C Companies with one ration-pack between two men; but B and D Companies could not be reached. At this time, a British helicopter casualty evacuation flight took place, successfully extracting C Company casualties from the forward slope of Darwin Hill, while under fire from Argentine positions.

To Keeble, now in command of 2 Para with the death of Lieutenant Colonel H Jones, the situation looked precarious, the Argentine position had been surrounded but not captured, and his fighting companies were exhausted, cold, and low on water, food, and ammunition.

His concern was that the Argentine reinforcements, dropped by helicopter, would either be used in an early morning counter-attack or used to stiffen the defenses around Goose Green.

He had seen the C Company assault stopped in its tracks by the anti-aircraft fire from Goose Green and had seen the Harrier strikes earlier that afternoon missing their intended targets. In an orders group with the A and C Company commanders, he indicated his preference for calling for an Argentine surrender, rather than facing an ongoing battle the following morning. This train of thought was based on the fact that the Argentine forces were surrounded and all outlying Goose Green Argentine positions were now in British hands.

However, at the same time, he put an alternative plan into action, in case the Argentines decided not to surrender. This plan was to "flatten Goose Green" with all available firepower and then launch an assault with all forces possible, including reinforcements he had requested from Brigadier Thompson.

On Thompson's orders, J Company of 42 Commando, Royal Marines, and the remaining guns of 8 Battery, and additional mortars were helicoptered in to provide the necessary support for a possible assault on the 29th of May.

However, on the morning of the 29th of May 1982, the formal surrender of Goose Green by the Argentine forces took place with 2 PARA securing a decisive victory, although with heavy losses.


Aftermath and Impact

The capture of Goose Green was a pivotal moment in the Falklands War. It demonstrated the resolve and capability of British forces operating far from their native shores of Great Britain in the world of modern combat, boosting morale both for the islanders and the populace in Great Britain. The victory also had a significant psychological impact on the Argentine forces, undermining their confidence and cohesion.

Over 1,200 Argentine soldiers from Goose Green were taken prisoner by the British. In questioning the prisoners it became quite clear that the use of the bayonet by the British was not only a shock to many of the Argentine soldiers but was a decisive factor in the collapse of morale and therefore, the overall collapse of Argentine forces at Goose Green. It should also be noted that the Argentine commander was fully aware that his command was surrounded and the British now could call upon large amounts of fire support.

The political and strategic implications of the battle were profound. Prime Minister Thatcher capitalized on the success, enabling the strengthening of domestic and international support for the British campaign. The victory at Goose Green underscored the effectiveness of British military strategy and tactics, even when facing numerically superior forces, setting the stage for subsequent operations to reclaim all of the Falklands Islands.


Conclusion

The Battle of Goose Green is remembered as a symbol of courage, skill, and determination of the British Parachute Regiment. Despite facing a numerically superior enemy, 2 PARA's audacious assault, tactical superiority and the overwhelming aggressive fighting ability of the British Airborne soldiers secured a crucial victory in the Falklands War, when international pressure was pushing for a negotiated settlement, that may have sided with the Argentine leadership.

The battle not only showcased the effectiveness of British forces but also highlighted the political and strategic dimensions of military decision-making in the heat of conflict. Reflecting on this historic engagement, the legacy of Goose Green endures as a true symbol of bravery and resilience, providing a reminder that extraordinary feats can be achieved when determination and skill combine in the face of adversity.


Find that piece of interest? If so, join us for free by clicking here.


Note

Battles are often confusing and full of contradictions from either side, and the battle for Goose Green is no exception, however, what is certain is that a smaller numerical force overcame a larger force by closing with the enemy with fixed bayonets and generating enough military violence to overcome the enemy positions.


Point of interest

The English Captain John Strong made the first recorded landing in the Falklands, in 1690, and named the sound between the two main islands after Viscount Falkland, a British naval official. The name was later applied to the whole island group. Whereas, Argentina was only founded as a country in 1816 on the 9th of July.

The Argentine sovereignty claim is based upon the inheritance of the islands, known as Las Malvinas in Argentina, from the Spanish crown in the early 1800s. Additionally, the Falkland Islands' proximity to Argentina's mainland appears to be reason enough for the claim by the Argentine government.


Lieutenant Colonel H Jones, Victoria Cross citation

On 28th May 1982 Lieutenant Colonel Jones was commanding the 2nd Battalion The Parachute Regiment on operations on the Falkland Islands. The Battalion was ordered to attack enemy positions in and around the settlements of Darwin and Goose Green. During the attack against an enemy who was well dug in with mutually supporting positions sited in depth, the Battalion was held up just South of Darwin by a particularly well-prepared and resilient enemy position of at least eleven trenches on an important ridge.

A number of casualties were received. In order to read the battle fully and to ensure that the momentum of his attack was not lost, Colonel Jones took forward his reconnaissance party to the foot of a re-entrant which a section of his Battalion had just secured. Despite persistent, heavy and accurate fire the reconnaissance party gained the top of the re-entrant, at approximately the same height as the enemy positions. From here Colonel Jones encouraged the direction of his Battalion mortar fire, in an effort to neutralize the enemy positions.

However, these had been well prepared and continued to pour effective fire onto the Battalion advance, which, by now held up for over an hour and under increasingly heavy artillery fire, was in danger of faltering. In his effort to gain a good viewpoint, Colonel Jones was now at the very front of his Battalion. It was clear to him that desperate measures were needed in order to overcome the enemy position and rekindle the attack, and that unless these measures were taken promptly the Battalion would sustain increasing casualties and the attack perhaps even fail.

It was time for personal leadership and action. Colonel Jones immediately seized a sub-machine gun, and, calling on those around him and with total disregard for his own safety, charged the nearest enemy position. This action exposed him to fire from a number of trenches. As he charged up a short slope at the enemy position he was seen to fall and roll backward downhill. He immediately picked himself up, and again charged the enemy trench, firing his sub-machine gun and seemingly oblivious to the intense fire directed at him. He was hit by fire from another trench which he outflanked, and fell dying only a few feet from the enemy he had assaulted.

A short time later A company of the Battalion attacked the enemy, who quickly surrendered. The display of courage by Colonel Jones had completely undermined their will to fight further.

Thereafter the momentum of the attack was rapidly regained, Darwin and Goose Green were liberated, and the Battalion released the local inhabitants unharmed and forced the surrender of some 1,200 of the enemy.

The achievements of the 2nd Battalion The Parachute Regiment at Darwin and Goose Green set the tone for the subsequent land victory on the Falklands. The British achieved such a moral superiority over the enemy in this first battle that, despite the advantages of numbers and selection of battleground, the Argentinian troops never thereafter doubted either the superior fighting qualities of the British troops or their own inevitable defeat.

This was an action of the utmost gallantry by a Commanding Officer whose dashing leadership and courage throughout the battle were an inspiration to all about him.

His Victoria Cross is displayed at the National Army Museum in Chelsea, London.


Other British awards

The Distinguished Service Order was awarded to Maj. C.B.P. Keeble, the Battalion second in command


The Military Cross Was awarded to:

Maj. J.H. Crossland: OC B Coy

Maj. C.D. Farrar-Hockley: OC A Coy

Lt. C.S. Connor: Recce Pl. Cmdr


Distinguished Conduct Medal was awarded to:

Cpl. D. Abols for his daring charges, which turned the Darwin Hill battle

Sgt. J.C. Meredith, Pl Sgt, 12 Platoon, D Company

Pte S. Illingsworth was posthumously awarded the DCM

The Falkland Islands are some 300 miles (or about 480 kilometers) off the coast of Argentina and have been a British-owned territory since the nineteenth century; in 1982 Argentina and Britain fought a war over ownership of the islands. Here, Matt Austin considers civilian casualties during the Falklands War in the wider context of the decline of the British Empire.

Argentine prisoners of war during the 1982 Falklands War. Source: Ken Griffiths, available here.

Argentine prisoners of war during the 1982 Falklands War. Source: Ken Griffiths, available here.

Introduction

Beginning on the second of April and lasting until the fourteenth of June 1982, Britain was engaged in a seventy-two day war to retain one of its few remaining commonwealth territories. Argentine writer Jorge Luis Borges refers to the Falklands War as “two bald men fighting over a comb,” a comparison that strongly outlines the sheer needlessness of the conflict in the eyes of many historians and writers.[1]It is therefore possible to suggest that the casualties endured during the Falklands War, an estimated eight hundred and seventy eight in total, with the inclusion of Argentine prisoners of war, numbering over eleven thousand, were themselves needless.[2]Ultimately, the motivations behind the Falklands War and the nature of how it was fought have led it to be considered one of the most unique conflicts in British military history.


The Decline of the British Empire

Following the Second World War, Britain underwent a period of decline. Due to the heavy economic losses endured during the conflict, the nation was unable to effectively fund its Empire and granted independence to a number of its former colonies from the 1940s onwards. The first of the major colonies to gain independence following the Second World War was India. With warring political groups and a lack of ‘safeguards’ for British business and trade interests, UK Prime Minister Clement Attlee decided Britain was to ‘abandon control’ of India in 1947.[3]

This was followed by the loss of numerous territories in the following decades, such as Ghana in 1957, Uganda in 1962, and Kenya in 1963. Consequently, the loss of Southern Rhodesia, or Zimbabwe, as the newly independent state became known, in 1980, was the last of the British territories in Africa. The loss of Southern Rhodesia represented the end of an era for the British Empire, following its inevitable decline in the decades after the Second World War.[4]This left the former international powerhouse of the British Empire with a severely reduced, sparsely scattered group of commonwealth territories, so threatening the nation’s global influence. With the threat of the Empire being completely lost, a concept that had become gradually apparent throughout the past several decades, Britain would therefore rigorously attempt to retain and protect any of its remaining territories against invasion. 


The Falklands War

The origins of the Falklands Warcan be attributed to the militant Argentine government’s decision to invade and occupy the neighboring islands in an attempt to encourage positive public opinion. Despite having a severely weakened economy and dealing with increasing demand for the introduction a democratic voting system, the government, under the control of their military dictator Leopoldo Galtieri, received an outpouring of public support in favor of the invasion of the islands, as Argentine feelings of nationalism surged.[5]This reinforced the decision to defend their newly captured territory against the prospect of a British invasion.

Following news of the Argentine invasion and take over of the Falkland Islands, Britain responded by sending a naval taskforce on April 5, 1982 to defend the islands from the invading forces. Ultimately, the conflict was short lived, as Britain was successful in its attempt to regain the Falkland Islands through the use of more advanced military technology and superior combat training. US president Ronald Reagan was initially skeptical of Britain’s decision to win back the Falklands, suggesting that it was not worth an invasion. However, in an attempt to avoid any political tension between the United States, and the United Kingdom, under Prime Minister Margaret Thatcher, he eventually decided to support the effort, providing Britain with weaponry and munitions, which aided the victory and shortened the conflict.


Military Casualties

The Argentine casualties during the Falklands War numbered up to six hundred and forty nine, around four hundred more than those of the British. The majority of the casualties of the Falklands War occurred during the attacks on naval ships carrying large numbers of troops. The specific case of the British attack on the Argentine ship, the General Belgrano, resulted in almost half of all Argentine casualties, with three hundred and twenty one of the ship’s one thousand one hundred crew being killed.[6]This has since been considered a highly controversial moment of the Falklands War, sparking the debate over a possible war crime, as the Belgrano was attacked thirty six miles away from the British exclusion zone that had been set up around the islands.[7]

Nevertheless, despite a vast majority of the casualties originating from naval attacks, friendly fire was a larger issue for British troops in the Falklands than the majority of its other twentieth century conflicts, relative to the scale and nature of the war. The majority of incidents of British friendly fire occurred at night. The reason for this can be attributed to the result of misinterpretation of the identity of British troops, among the ‘monotonous, featureless terrain’ of the Falkland Islands.[8]Furthermore, it was not simply British troops that fell victim to friendly fire, as the only civilian casualties of the Falklands War are attributed to this.


Civilian Casualties

The decisive British victory, however, was underpinned by the regularly overlooked deaths of three civilians.[9]Whilst civilian casualties are unfortunately rarely unique during wartime, the case of the death of three Falkland Islanders is in itself a rare occurrence, as these deaths were caused by friendly fire. The three civilian deaths of the Falklands War hold great significance, as they demonstrate the contradictory nature and moral considerations that embodied this conflict. As the islands had been under British rule for centuries, those living there were British citizens and being predominantly farmers, had little to no means of preventing the unexpected Argentine invasion. Consequently, there must have been a sense of relief when news that the British would launch an invasion to secure back the islands reached those living there.[10]However, this was not to be the case for three Falkland Islanders living in the capital, Port Stanley, as Susan Whitley, Doreen Bonner, and Mary Goodwin unfortunately lost their lives during the British bombing of the capital.[11]Whilst these deaths are often overlooked in what is a considerably neglected conflict in itself, they have come to somewhat represent British international relations in the latter half of the twentieth century.

What is therefore so intriguing about these deaths are the wider moral implications that surround them. Britain, in an attempt to recapture the islands, supposedly for the safety of the Falklanders and the right to retain their British identity, contributed to the only incidents of civilian casualties of the war. This represents the contradictory nature of this conflict and creates a wider moral question of whether the unrealistic perception of the ‘Empire’ and the lengths that Britain would go to ensure its survival was worth more to the government and foreign policy makers than the people they were trying to protect. 


Conclusion

The Imperial undertones of the Falklands War are highlighted by these deaths; this article therefore concludes by posing the question of British morality and whether this conflict was simply an overreaction to the post war decades characterized by the decline of the once powerful Empire that built up and bubbled over, culminating in one of the most unnecessary, frustrating conflicts in the nation’s history.


What do you think of the author’s arguments? Let us know below.


[1]Miles Kington, “What did you do in the Falklands War, Daddy?” The Independent, October 28, 1998, https://www.independent.co.uk/arts-entertainment/what-did-you-do-in-the-falklands-war-daddy-1181032.html.

[2]“Falkland Islands War. Cost and Consequences,” Britannica, accessed 17/11/2018, https://www.britannica.com/event/Falkland-Islands-War#ref302171.

[3]Nicholas Owen, “The Conservative Party and Indian Independence, 1945-1947,” The Historical Journal 46, no. 2 (June 2003): 404.

[4]Hevina S. Dashwood, “Inequality, Leadership and the Crisis in Zimbabwe,” International Journal57, no. 2 (Spring 2002): 209.

[5]Paola Ehrmantruat, “Aftermath of Violence: Coming to Terms with the Legacy of the Malvinas/Falklands War (1982),” Arizona Journal of Hispanic Cultural Studies 15 (2011): 95-96.

[6]“Is Maggie Thatcher a War Criminal?” Belgrano Enquiry, accessed 10/12/2018, http://belgranoinquiry.com/.

[7]“Is Maggie Thatcher a War Criminal?”

[8]Beck, “How Are You Enjoying the Day?”

[9]Lucy Beck, “How Are You Enjoying the Day? Remembering the victims of the Falklands War,” April 2007. http://archive.ppu.org.uk/falklands/falklands3.html.

[10]David Saunders, Hugh Ward, David Marsh and Tony Fletcher, “Government Popularity and the Falklands War: A Reassessment,” British Journal of Political Science 17, no. 3 (July 1987): 281-282.

[11]Beck, “How Are You Enjoying the Day?”

The Falklands War took place between Britain and Argentina in 1982. The Falklands are a British territory, about 500 kilometers off the coast of Argentina, that Argentina invaded in April 1982. The British had to quickly launch an operation to re-claim the islands. And part of this operation was Operation Black Buck – the longest bombing run in history. Dean Smith explains.

A Vulcan XM607, which carried out the first Operation Black Buck raid. Source: Jebediah Springfield, available here.

A Vulcan XM607, which carried out the first Operation Black Buck raid. Source: Jebediah Springfield, available here.

War in the South Atlantic

On April the second 1982, the Argentine military under the direction of President Leopoldo Galtieri invaded the British Falkland Islands. The British Prime Minister, Margaret Thatcher, promised a swift and decisive response. As a result, on April 5th, a Naval Taskforce left Britain on route to Ascension Island, from where it would carry out the second route of its journey to retake the Falklands from Argentine control. 

At the same time, the British Royal Air Force’s Avro Vulcan bomber was due to be retired that year. However, the Falklands conflict gave the ageing nuclear bomber a stay of execution and pushed it into combat service. The Vulcan was not only used in anger for the first time in April 1982, but it also took part in what was the longest successful bombing run in history: a round flight of almost 13,000 kilometers, between Ascension Island and the Falklands (Blackman, 2014). 

During the planning stages of the assault on Argentine held locations on the Falklands, much attention was paid to how to achieve air superiority over the islands (Hasting, 2013). The British Air Force would be comprised primarily of Royal Navy Sea Harriers, operating from aircraft carriers such as the British Flagship HMS Hermes (Ward 1993). 

From the airfield outside Port Stanley, Argentine fighters could be deployed to intercept Royal Navy aircraft. As had been well demonstrated during the Battle of Britain in World War Two, an assault on an island stronghold by air is advantageous to the Air Force of the defending side (Holland, 2010). As a result, much effort was put into attempting to disable the Argentine controlled airfield near Port Stanley. 


Technical Difficulties

A solution was devised using the Avro Vulcan bomber, performing extreme distance bombing runs from Wideawake Airfield on Ascension Island to Port Stanley on the Falklands.

However, there were multiple problems with this idea. The distance between Ascension Island and the Falklands was approximately 6,300 kilometers, with the maximum effective range of the Vulcan being a mere 4,171 km. Due primarily to the plans to decommission the Vulcan that year, the aircraft had no operational air-to-air refueling capabilities, and hadn’t for quite some time (White, 2012). Around the clock engineering work was required to fix the issue and install the appropriate internal refueling system, and to convert the aircrafts’ bomb bay from its current nuclear configuration, back to a conventional weapons model (Tuxford, 2016). 

With all of these modifications in place, plans were set up to support the Vulcan with a staggering eleven victor tankers to provide air-to-air refueling throughout its marathon journey to the Falklands. The goal of the mission was to drop conventional weapons on the airfield at Port Stanley, with the intention of rendering them inoperable to Argentine forces.


V-Force in Flight

At 10:30 PM on April, 30 1982, the first two Vulcan bombers fired up their engines, followed closely by a third reserve bomber, and set out for their assault on Port Stanley. Within 4 minutes of departure the lead Vulcan, XM598, flown by Squadron Leader John Reeve, experienced a major technical problem - the cabin refused to pressurize. After a valiant attempt by Reeve and his crew to jury-rig a solution, the Vulcan was forced to turn back. 

The second Vulcan bomber, XM607, commanded by Flight Lieutenant Martin Withers now took the lead. Withers’ bomber took on fuel five more times before reaching the Falklands. However, an electrical storm interfered with the last refueling stop, an issue that almost jeopardized the entire operation. As the commander of the Vulcan, it fell to Withers to decide how the operation should proceed. He was quoted as saying:

“We’re short on fuel, but we’ve come this far, I’m not turning back now.”(White, 2012)


At the distance of 470 kilometers from its target, XM607 began its descent that would take it below the level of the Argentine radar system. When passing the eighty-kilometer mark from Port Stanley, Withers pulled the aircraft into a steep climb, taking the Vulcan 3,000 meters into the air in order to avoid Argentine anti-aircraft fire. 

This action brought XM607 well into the scope of the Argentine radar system. However, the radar operators never called it in, believing the Vulcan to be a friendly aircraft, due in no small part to the fact the British fleet was still thousands of miles away (Blackman, 2014).

At an altitude of 3,000-meters, and travelling at an average speed of 650km/h, the target airfield off of Port Stanley was not an easy target. At approximately 3 kilometers out from the target, the Vulcan released its payload. 

After the payload was released, Withers turned the Vulcan around and began the race back to Ascension Island before their fuel reserves ran out. There was no time to confirm the time, every second they were in the air, their fuel reserved depleted even further. Fortunately, the return trip was without incident and the aircraft touched down on at Wideawake Airfield after a record breaking 16-hour mission that covered almost 13,000 kilometers.  

The mission was a success, Withers’ crew had carried out the longest bombing run in history and struck their target, half a world away. The success of the operation produced incentive for further raids using the same plan. As a result, Withers’ initial flight became the first of seven Black Buck raids.


Successive Operations

The following seven operations were based around the successful plan of Black Buck 1. But, after losing the element of surprise, as well as the requirement to hit varied targets, none of the following operations had quite the same effect as the first (March, 2006). 

Black Buck 2 followed a plan nearly identical to the first one. However, the need to avoid Argentine anti-aircraft fire led to a higher deployment altitude of about 5,000-meters and the bombing run missed the runway completely.

Black Bucks 3 and 4 were called off due to adverse weather conditions and a refueling malfunction respectively. Black Buck 5 was intended to destroy Argentine radar installations using two Shrike Missiles, but this proved ineffective as the first missile only caused minor damage and the second missed completely. 

Black Buck 6 was intended to carry out a similar task to Black Buck 5 and was more successful. Even so, this mission is notable due to technical difficulties forcing the crew to land in Brazil, prompting their detention by the Brazilian government, which led to an international incident and a negotiation for the return of the crew (White, 2012).

The final raid, Black Buck 7 was flown on the June, 12th by XM607, again captained by Withers. This mission was intended to attack Argentine troop positions around the runway near Port Stanley, due primarily to the end of the war being in sight and the RAF desiring to use the Port Stanley runway after hostilities had ceased. Due to a misalignment, all of the bombs missed their targets. This was ultimately irrelevant as Argentina surrendered two days later (Hastings, 2016). 


Operation Summary

Table sourced from Polmar (2004).

Table sourced from Polmar (2004).

The Effectiveness of Black Buck

There has been considerable debate about the effectiveness of the operation. Some critics have described the contribution of the bombing runs as “minimal” (Ward, 1993). Although Mirage fighters were pulled back to Argentina following the raids, Argentine C-130s continued to use the runway at Port Stanley until the end of the war (White, 2012 Blackman, 2016). 

The idea that the raids caused considerable fear of an attack on the mainland has been dismissed as “propaganda” by formal royal navy commander Nigel “Sharkey” Ward. In his 1993 work Sea Harrier over the Falklands, Sharkey states:

“The Mirage IIIs were redrawn from Southern Argentina to Buenos Aires to add to the defences there following the Vulcan raids on the islands. Apparently, the logic behind this statement was that if the Vulcan could hit Port Stanley, that Buenos Aires was well within range as well and was vulnerable to similar attacks. I never went along with that baloney. A lone Vulcan or two running into attack Buenos Aires without fighter support would have been shot to hell in quick time.”


In terms of the technical success of Operation Black Buck, there is considerable doubt as to the extent that the bombing raids actually made any significant impact on Argentine operations. 

A United States Marine Corps study concluded that:

“The most critical judgment of the use of the Vulcan centers on the argument that their use was "...largely to prove [the air force] had some role to play and not to help the battle in the least." This illustrates the practice of armed services to actively seek a "piece of the action" when a conflict arises, even if their capabilities or mission are not compatible with the circumstances of the conflict. Using Black Buck as an example shows the effects of this practice can be trivial and the results not worth the effort involved.” (DeHoust, 1984)


Operation Black Buck was clearly one of the most ambitious combat operations in military aviation history. The skill of the RAF engineers and the bravery of the pilots and aircrew are made clear in the accounts of those who participated in the operation. Though the effectiveness of the operation is questionable at best, the success of such a complex and technically demanding operation means that Black Buck is rightly regarded as one of the Royal Air Force’s finest moments.


What do you think of Operation Black Buck? Let us know below.

References

Blackman, T. (2014). Vulcan Boys. London: Grub Street, pp.151-171.

DeHoust, W. (1984). [online] Global Security. Available at: hhttps://www.globalsecurity.org/military/library/report/1984/DWF.htm [Accessed 20 Aug. 2018].

Hastings, M. (2013). The Battle for the Falklands. [London]: Pan.

Holland, J. (2010). The Battle of Britain. London: bantam Press, pp.85-96.

March, P. (2006). The Vulcan Story. 2nd ed. Chalford: Sutton Publishing, pp.64-72.

Polmar, N, and Bell, D. 2004. One Hundred Years of World Military Aircraft. Annapolis, Maryland: Naval Institute Press.

Tuxford, B. (2016). Contact!: A Victor Tanker Captain's Experiences in the RAF, Before, During and After the Falklands Conflict. 1st ed. London: Grub Street Publishing, pp.122-149.

Ward, Sharkey. (1993). Sea Harrier Over the Falklands. Havertown: Pen and Sword, pp.7-12.

White, R. (2012). Vulcan 607. London: Bantam, pp.154-167.